Key Takeaways: 4-2-3-1 Utility for Lower Leagues
- The 4-2-3-1 formation offers balance, useful for lower league squads needing flexibility.
- Match plans help adjust the tactic against different teams you face.
- Finances are tight; use free agents and bargain buys wisely.
We’ve seen managers try fancy things, pressing high with slow defenders, and playing out from the back with keepers who can’t pass ten yards. Don’t work. The 4-2-3-1 gives you a base. You can tweak it.
Make it more direct, make it sit deeper. It adapts. It’s about getting results, not winning style points. And down in the depths of the lower leagues, results keep you in a job. Simple as that, ain’t it?
It’s less about having eleven perfect players and more about having eleven players who can do a job in a spot. You ever seen a lower league game where one player carries the team? This formation lets that happen.
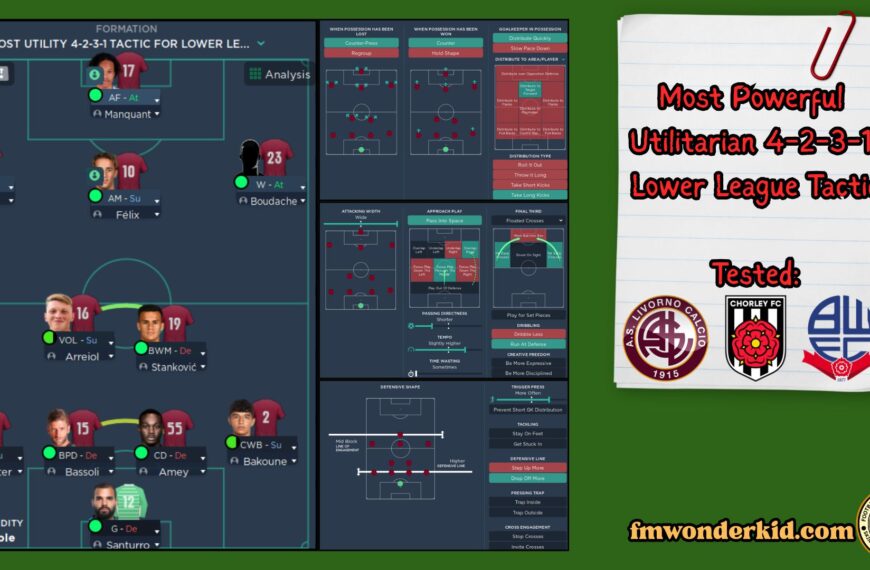
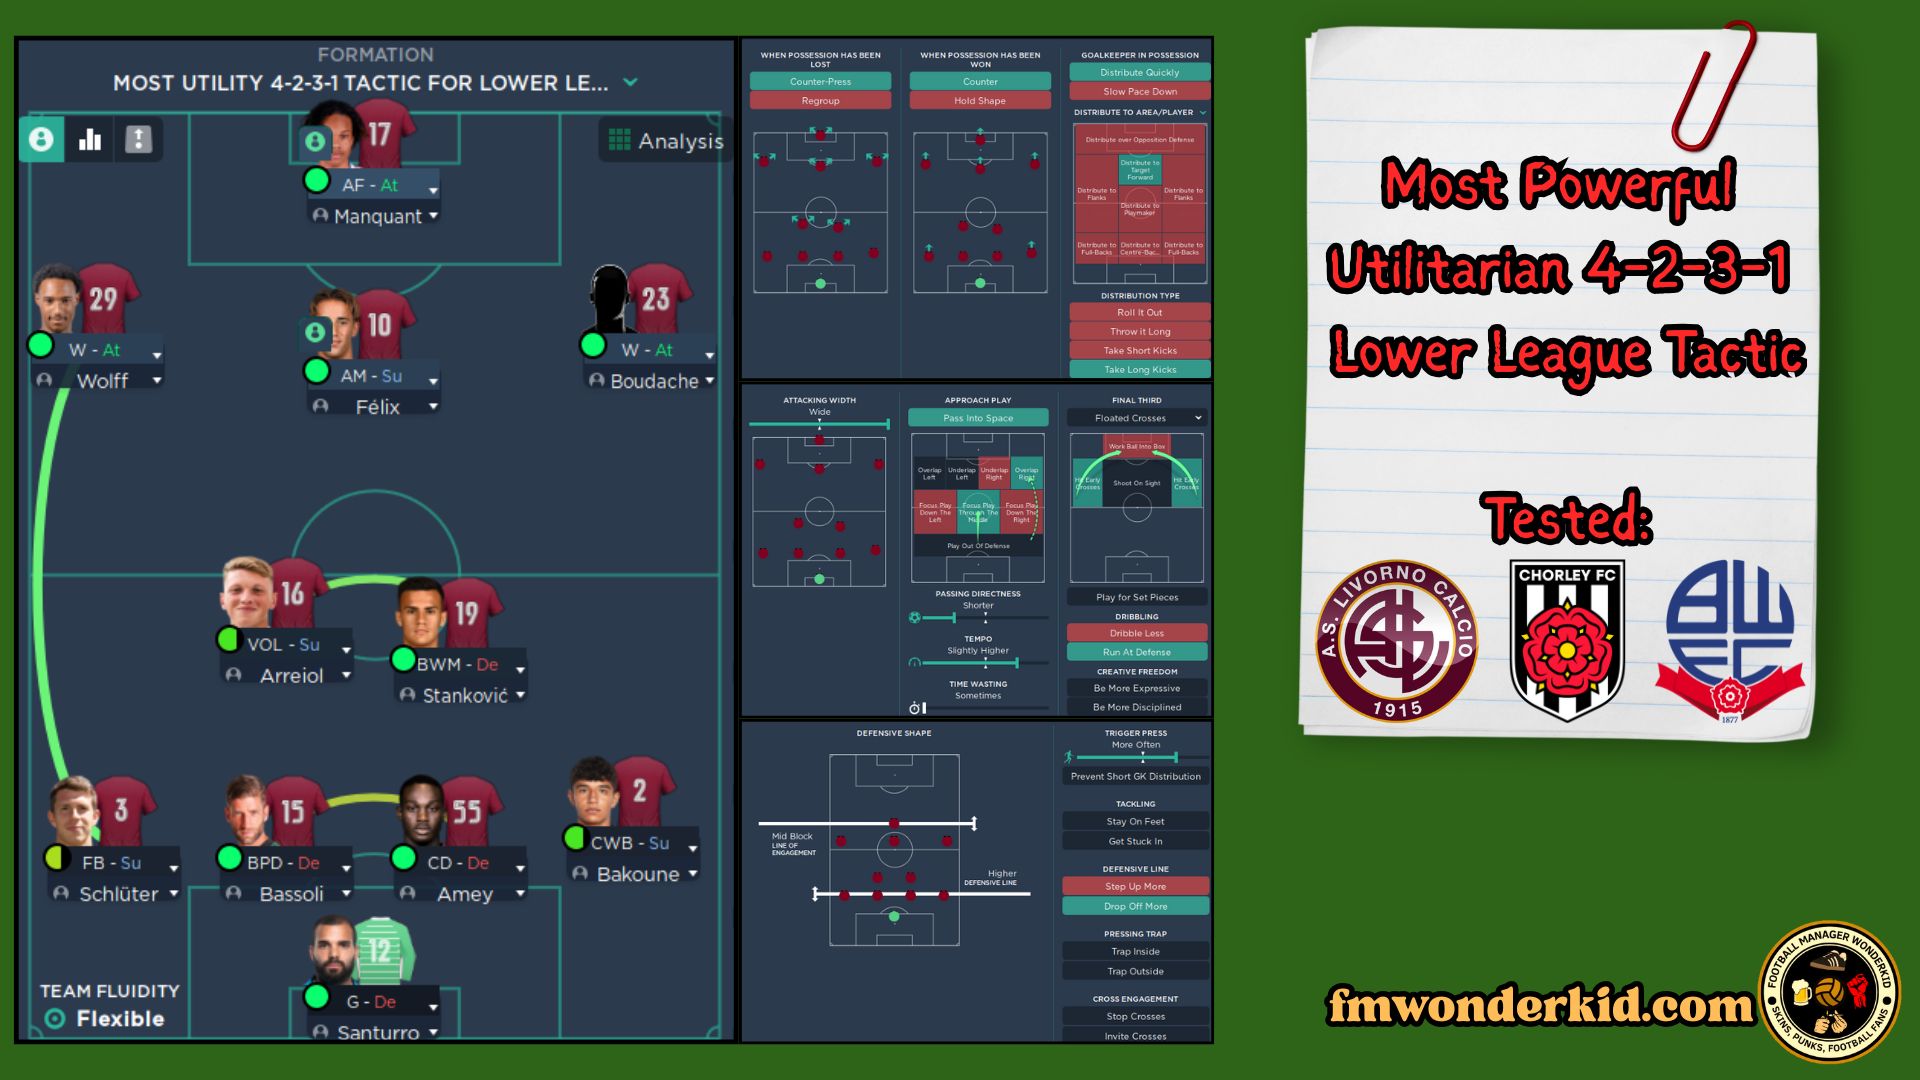
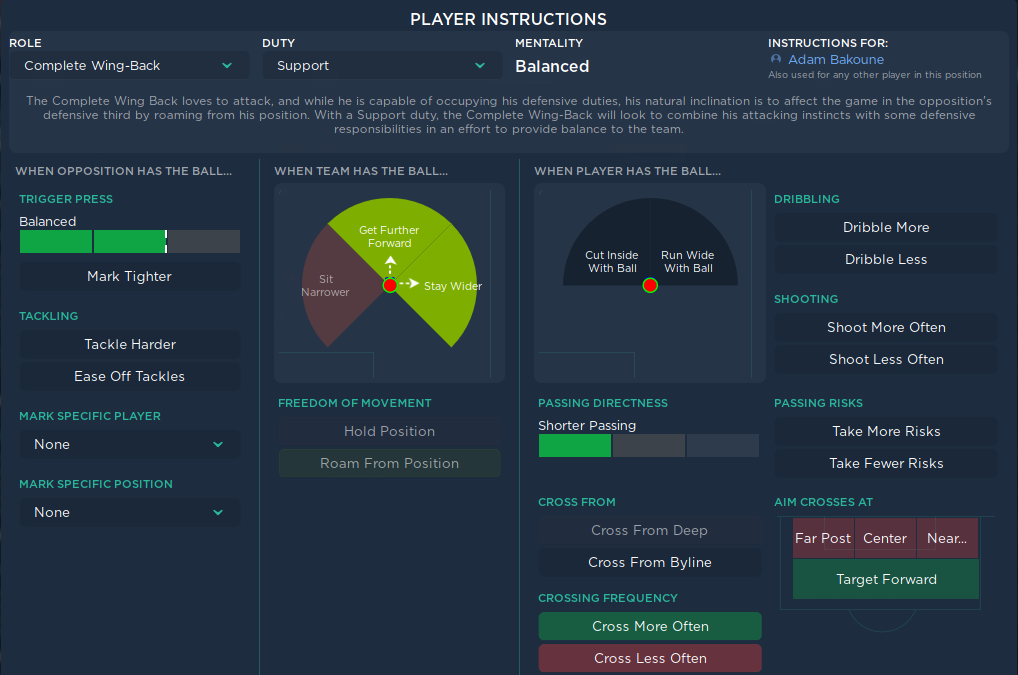
In this 4-2-3-1 formation for lower leagues, it depends on which of your focal points in attack will impose itself: Complete Wingback, Attacking Midfielder, Target Man, or maybe a dynamic all-around Segundo Volante with attacking instructions?
Setting up the basic shape and how you want the team to think is step one. You got the 4-2-3-1 there, four defenders, two midfielders, three attacking midfielders across the pitch, and the lone striker up top. Dead simple!?
The Specifics: Setting Up This 4-2-3-1 Tactic
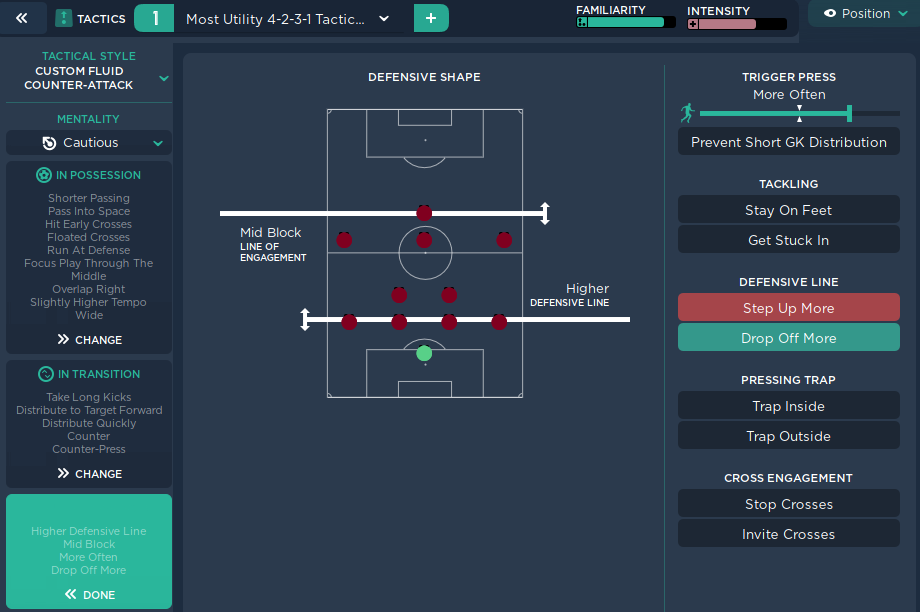
First off, the Tactical Style is set to ‘Custom Fluid Counter-Attack‘. That tells you they want the team to be adaptable, not rigid, and hit teams when they lose the ball. Fluidity means players move around a bit more, cover for each other. Counter-attack is obvious – soak up pressure, then hit hard and fast when the other team is out of shape. It’s a solid choice for lower leagues where you often face teams with better players who will try to dominate possession.
The Mentality is ‘Cautious’. Now, this might surprise some people with a 4-2-3-1, ’cause it’s seen as an attacking shape. But remember, this is the lower league. ‘Cautious’ doesn’t mean you don’t attack; it means you prioritize defensive shape first. Players take fewer risks, stay in position more, and rely on quick breaks.
It pairs well with ‘Counter-Attack’. You’re not inviting pressure exactly, but you’re set up to deal with it and then launch forward when the time is right. It’s a pragmatic approach, yeah? You can’t go gung-ho with a leaky defence.
4-2-3-1 Lower League Tactic – In Possession
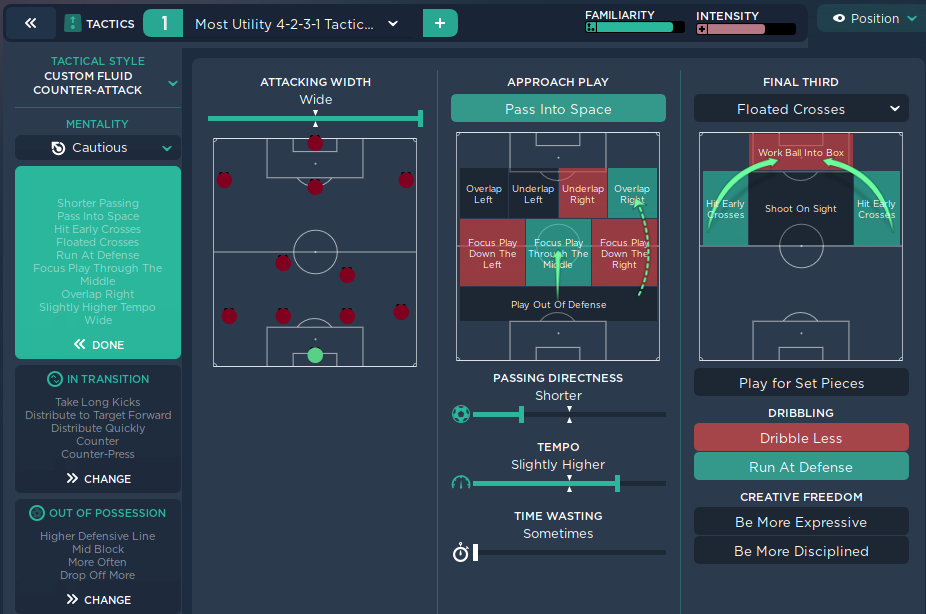
‘Shorter Passing’ and ‘Pass Into Space‘ mean they want to keep the ball on the ground when possible, but also exploit gaps if they appear.
‘Run At Defense’ means encourage dribbling, which is good if you have a tricky attacking midfielder or wide player.
‘Focus Play Through The Middle’ and ‘Overlap Right’ show a preference for attacking through the centre but using the right-back for width and crosses too.
‘Slightly Higher Tempo’ means they move the ball a bit quicker than normal, and ‘Wide’ attacking width uses the whole pitch. This gives you the width the formation naturally offers.
‘Hit Early Crosses’ and ‘Floated Crosses’ tell you the wide players are expected to get the ball in the box quickly, maybe aiming for a target man or players arriving late.
‘Floated Crosses’ is chosen. This is best if your striker or attacking midfielders are good in the air, or if the opposition centre-backs are small. It keeps the ball in the air longer, giving your players time to get there.
This combination suggests the team primarily attacks centrally but uses the right full-back as a key outlet for width and crosses. ‘Play Out Of Defense‘ is not selected, meaning the keeper and defenders are more likely to clear the ball long or to the flanks quickly, rather than trying short passes from the back. This makes sense in lower leagues where defenders often lack the skills for intricate build-up play.
4-2-3-1 Lower League Tactic – In Transition
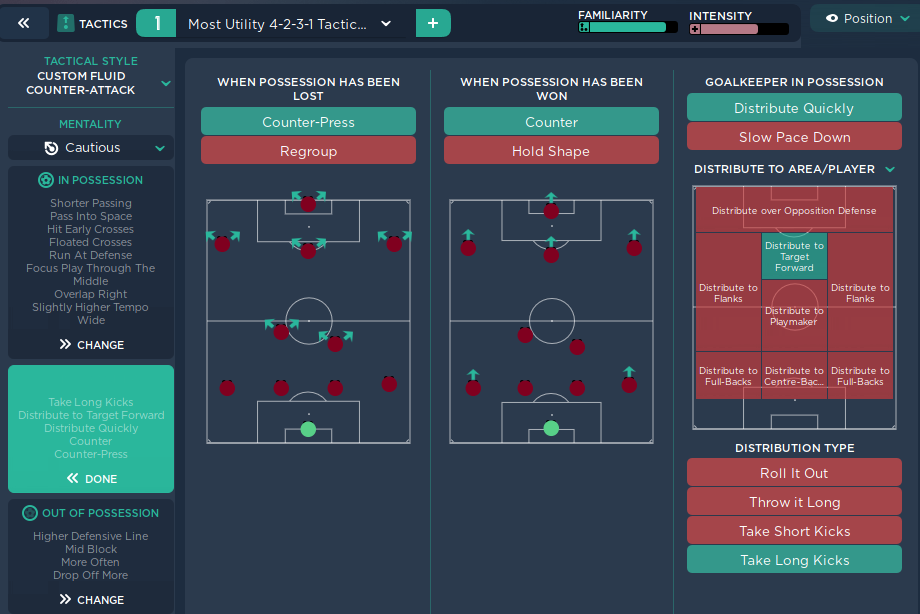
Putting it all together, the transition strategy for this specific 4-2-3-1 is clear. When the ball is lost, immediately try to win it back high up (‘Counter-Press’).
This is aggressive and relies on player fitness and determination. When the ball is won, immediately look to attack (‘Counter’). Don’t wait around. The keeper is part of this; he gets the ball forward fast (‘Distribute Quickly’), aiming for the striker or the flanks (‘Distribute to Target Forward’, ‘Distribute to Flanks’) using long kicks (‘Take Long Kicks’).
‘Counter-Press’ means that as soon as a player loses possession, they and their nearby teammates immediately try to win the ball back. They don’t drop back, they hunt the guy who just took it. This is high-intensity. Why pick this in the lower leagues?
‘Cause players can be sloppy on the ball. If you press ’em fast, they might give it right back. The alternative, ‘Regroup’, means players drop back into their defensive shape after losing the ball. That’s safer, but gives the opponent time.
Does this high pressure work with lower league fitness? It can, but you need players with good ‘Stamina’ and ‘Work Rate’. You might need to adjust training to focus on these attributes. It’s a risk, but winning the ball high up the pitch is a great way to start a counter-attack.
What Happens When We Get the Ball Back?
Alright, ball lost covered. What about ‘When Possession Has Been Won’? The picture shows ‘Counter’ is the active instruction, not ‘Hold Shape’. This is the core of the ‘Counter-Attack’ style we saw earlier.
When your team wins the ball back, players immediately look to move forward quickly. They make attacking runs, and they look for forward passes. They don’t wait for everyone to get into a perfect formation.
‘Hold Shape’, the alternative, tells players to keep their positions and build possession more slowly after winning the ball. That’s for teams that want control. This tactic doesn’t. It wants to hit the opponent when they are vulnerable, spread out from attacking.
Why is ‘Counter’ good for lower leagues? Teams often leave gaps when they attack. If you win the ball and go fast, you can exploit that space before they recover.
Goalkeeper In Transition
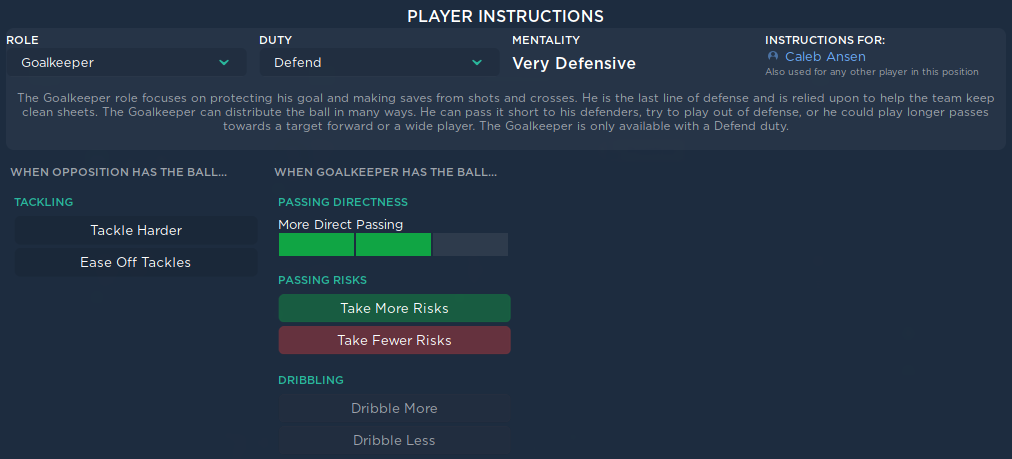
‘Distribute Quickly’. He doesn’t want the keeper slowing things down (‘Slow Pace Down’ is red). As soon as the keeper gets the ball, from a save, a corner, whatever, he should look to get rid of it fast.
This fits perfectly with the ‘Counter’ instruction when possession is won. The keeper is the first point of attack. Get the ball, get it forward, start the counter. Why is ‘Distribute Quickly’ good for this tactic? It stops the opposition from pressing your keeper and defence high up. It also launches attacks before the opponent can reset their defence.
Desperately searching the market frantically for a keeper with decent ‘Passing’ and ‘Vision’ or ‘Kicking’, depending on where he’s told to distribute.
4-2-3-1 Lower League Tactic – Out Of Possession
This is how the team responds when the opponent has possession of the ball. It’s arguably the most crucial part in lower leagues, ’cause if you can’t defend, you ain’t winning nothing, are ya?
‘Out Of Possession’. ‘Trigger Press’ is set to ‘More Often’. This means players will press the opponent on the ball relatively frequently when they enter the team’s line of engagement (the Mid Block). They won’t press every single time, but they’ll look for opportunities to close down players with the ball. This needs players with good ‘Work Rate’ and ‘Aggression’.
This setup is quite active defensively for a ‘Cautious’ mentality. It aims to win the ball back relatively high up the pitch through pressing, rather than sitting deep. This feeds the ‘Counter-Attack’ style. You win the ball in the middle third, and you’re already in a good position to launch a quick attack with your attacking midfielders and striker. It’s a system designed to be defensively sound by being compact and proactive, but it does require players who can maintain concentration and physical effort. It’s not a simple defensive shell; it’s defence as a way to create attacking opportunities.
The other sections are not checked because we are fucking in the Vanarama League, Series D, or Kazakhstan’s second league. – This can be bolded
An excellent tactic for the journeyman challenge, who likes it ↓↓↓

Player Roles + Instructions for 4-2-3-1 Lower League Tactic
Goalkeeper Instructions
Right Back Instructions
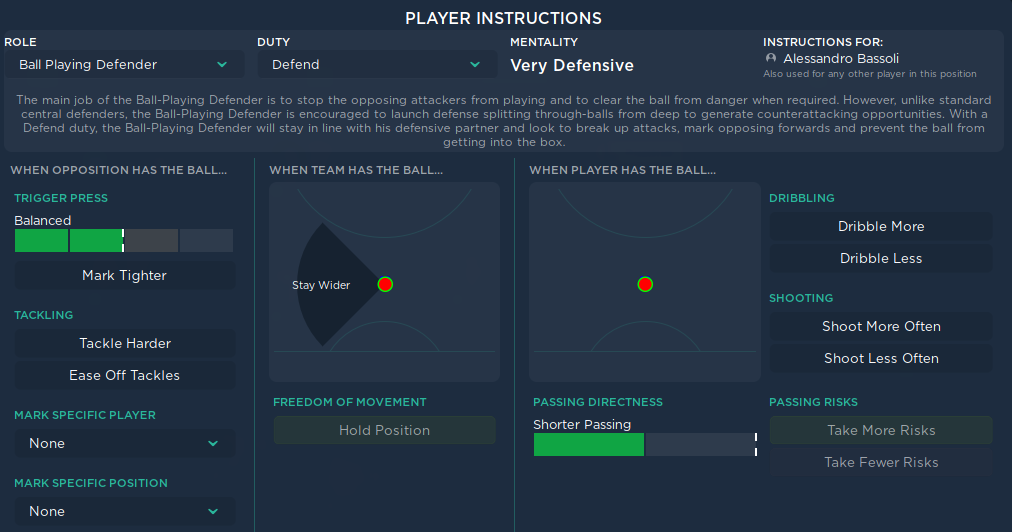
Left Central Defender Instructions
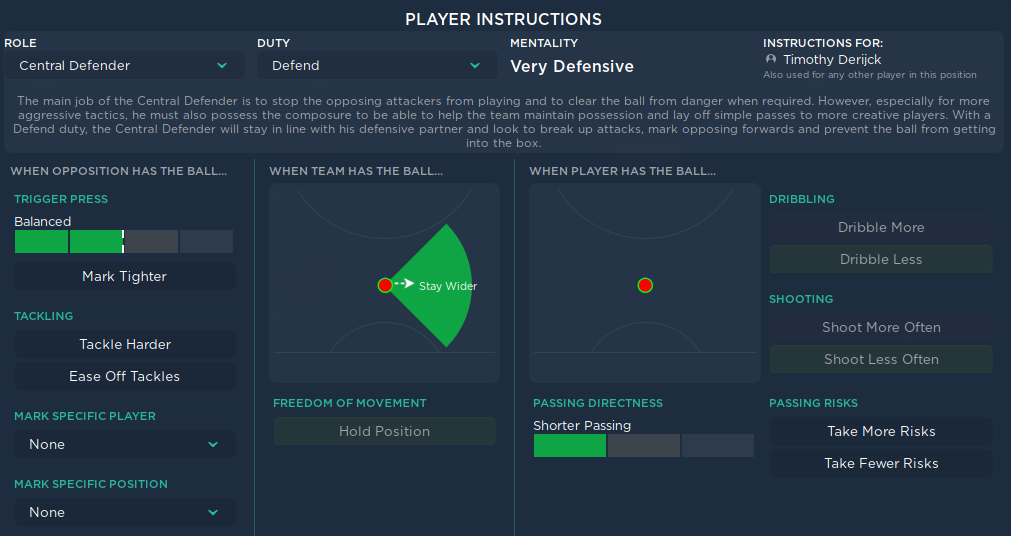
Right Central Defender Instructions
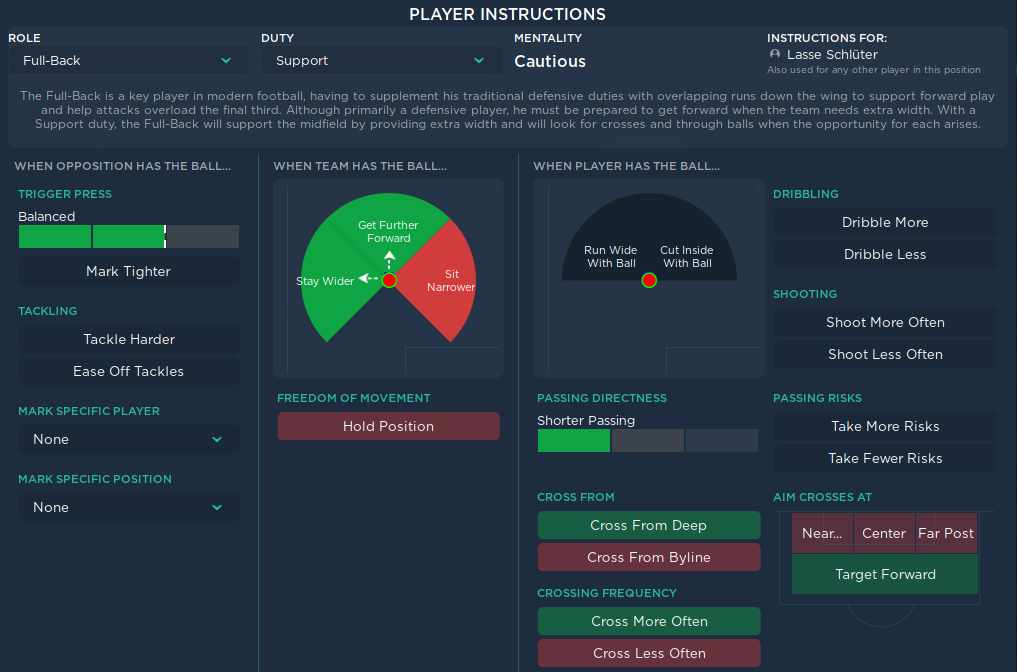
Left Back Instructions
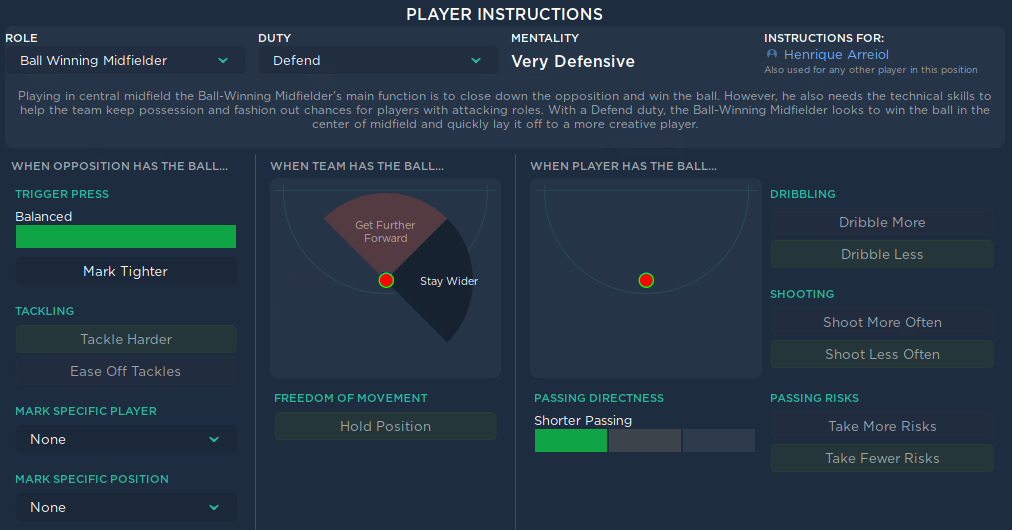
Defensive Midfielder – BWM Instructions
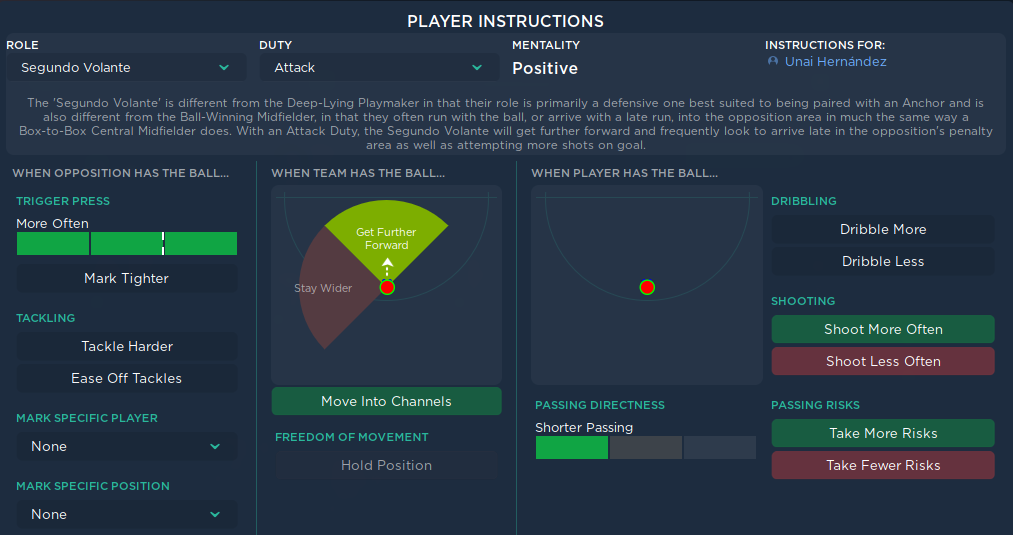
Defensive Midfielder – Segundo Volante Instructions
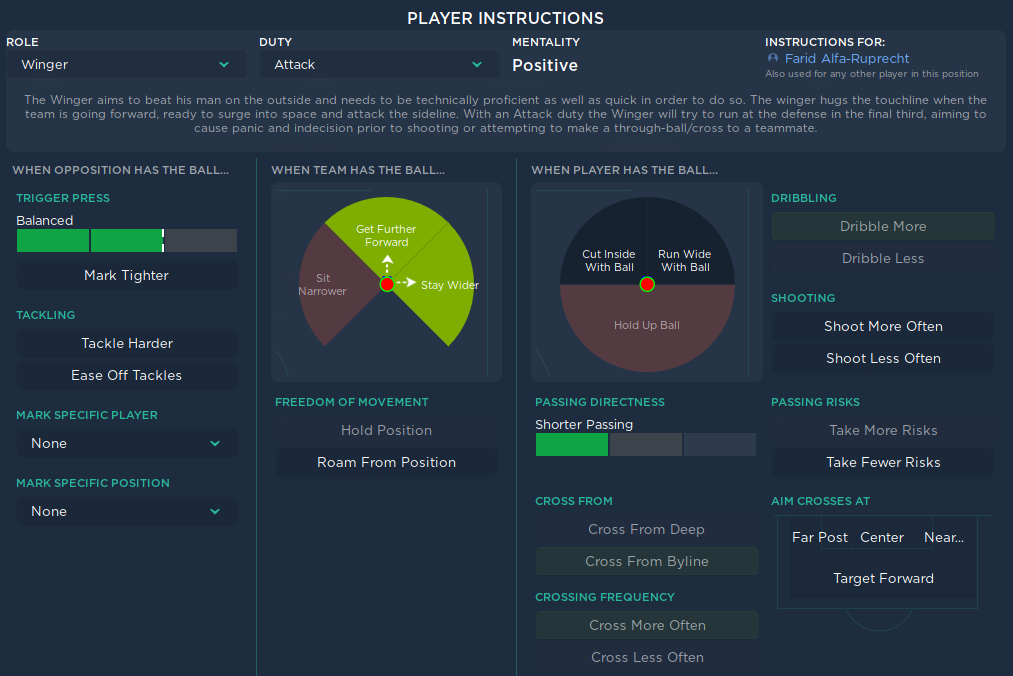
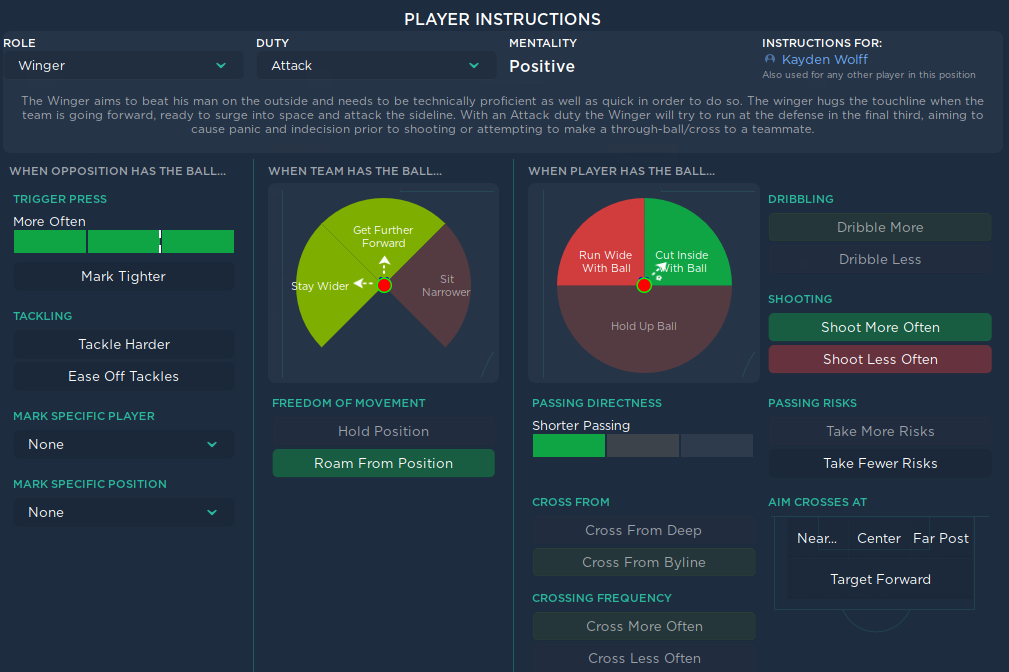
Right Winger Instructions
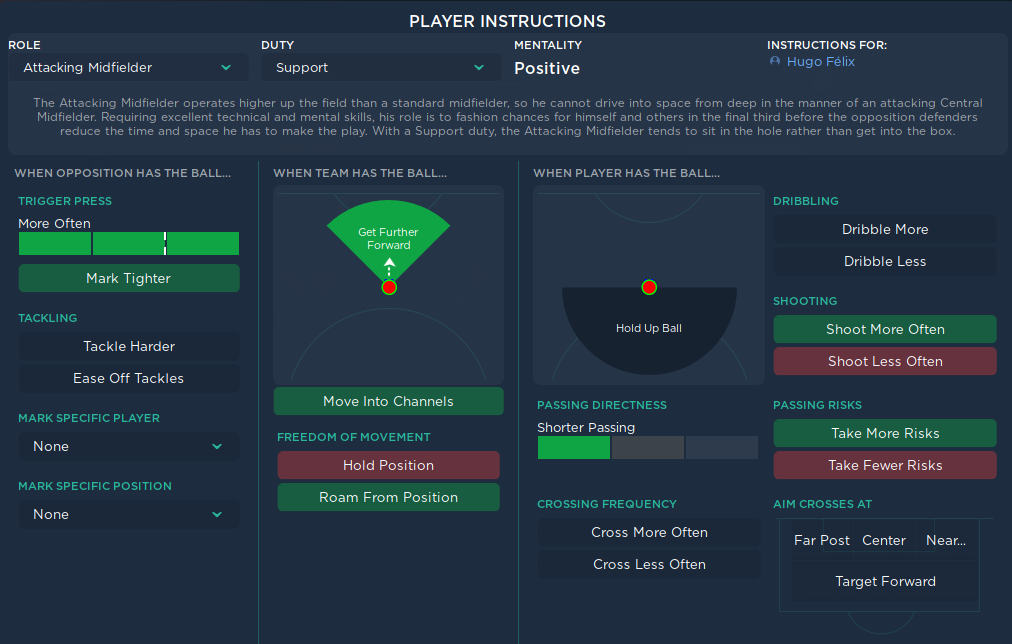
Attacking Midfielder Instructions
Left Winger Instructions
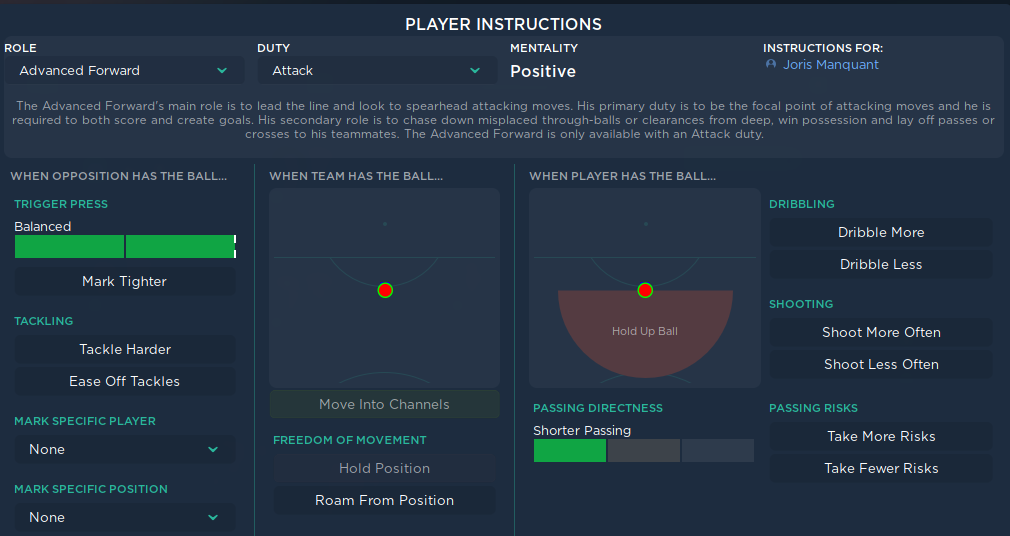
Striker Instructions
Most Powerful Utilitarian 4-2-3-1 Lower League Tactic – DOWNLOAD
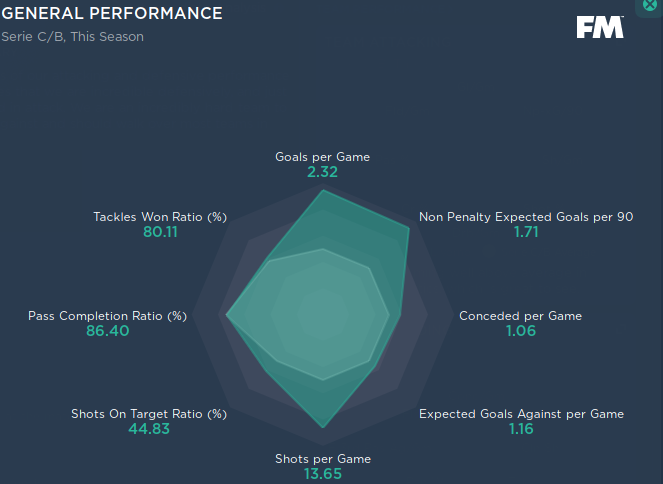
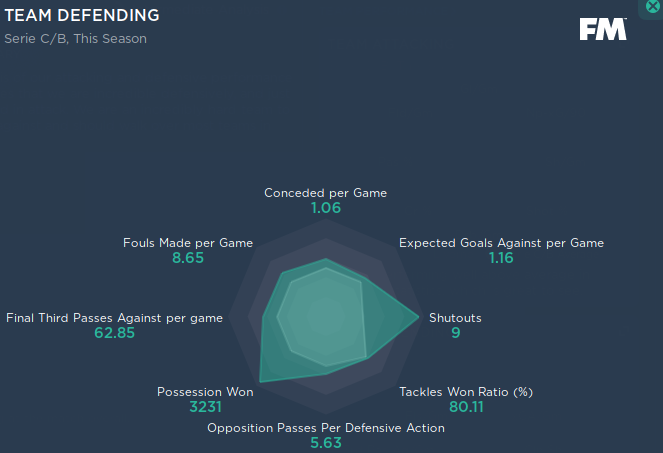
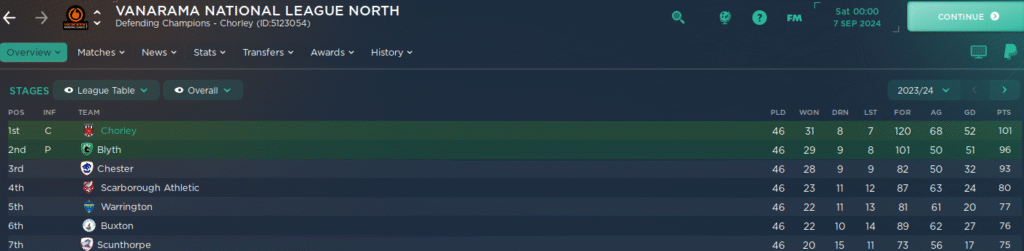
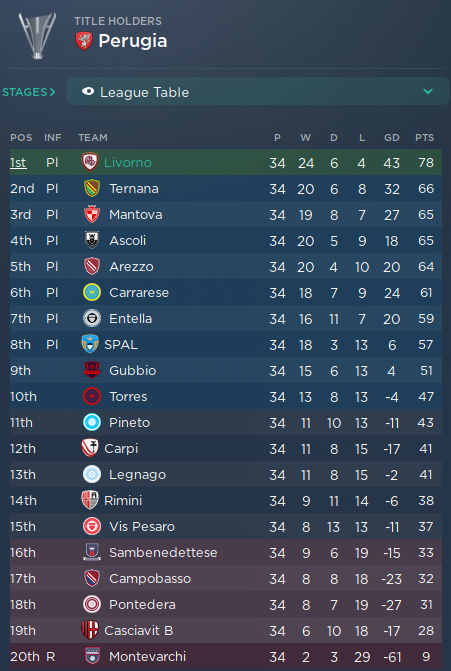
Results:
4231 Tactic for Lower League FAQ
Keep the team instructions simple. Focus on basic things like passing directness, tempo, and defensive shape. Give players simple roles they can understand. Don’t overload them with complex instructions. Repetition in training helps.
It’s highly versatile because of the balanced shape, but you need players who can perform the basic duties in the key roles (defensive midfielder, attacking midfielder, striker). You might need to adjust specific instructions based on your squad’s strengths and weaknesses.
You can drop the defensive line slightly or significantly. You might also need to adjust the pressing intensity (‘More Often’) or ensure your defensive midfielder is on a ‘Defend’ duty and instructed to hold position. Check your centre-backs’ pace; if they are slow, a higher line is risky.
The ‘Cautious’ mentality provides a solid defensive base out of possession. The transition settings describe what happens immediately after losing or winning the ball. You are cautious when defending in shape, but aggressive and fast when the opponent is potentially exposed during a transition. They complement each other by aiming for defensive stability and opportunistic attacking.
Yes, it can. You need players with good ‘Stamina’ and ‘Natural Fitness’. You might need to rotate the squad more or adjust training to improve these attributes. Monitor player condition during matches.